Read Footer Formatting and Layout Word Macro
Word macros are one-click wonders that let you program complex procedures to launch at your behest. Here are a few examples to go yous started. One creates your visitor letterhead; the second ane inserts pre-formatted tables; and the third ane defines and designs custom volume formats.
NOTE: You'll see some instructions with strings of keystrokes that are macro instructions for repositioning your cursor. Be sure to copy them exactly as written.
Set up, ascertain, and record macros
Step one: Set up the macro
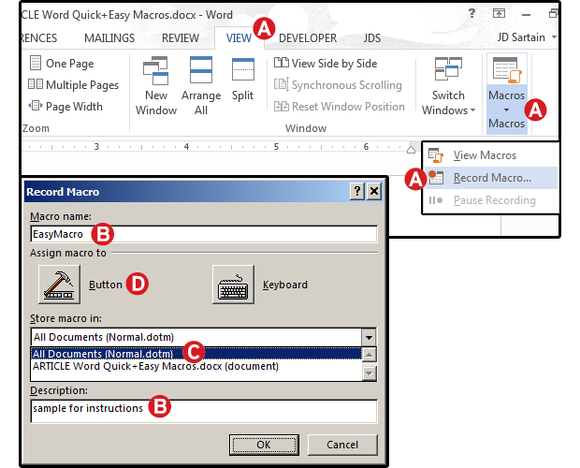
A. Select the View tab, then click Macros > Record Macro.
B. In the Record Macro dialog box, enter a macro name and clarification. Follow these rules for the name:
- Macro names must begin with a letter of the alphabet and utilise either letters or numerals. You cannot use spaces, non-alphanumeric characters, or periods.
- Macro names can exist 80 characters maximum
- Macro names cannot conflict with the program's reserved commands or keywords such as Impress, Save, Copy, Paste.
- Descriptions are but notes that summarize the macro's role.
C. For the Store Macro In field, cull All Documents to run this macro in all of your Word documents, or select the current document (displayed by filename) to use this macro in the current certificate only. Click OK.
D. Next, in the Assign Macro To console, click Button or Keyboard (shortcut) for the method used to access and run the macro.
Note: Most of the shortcut keys are already used by the organisation. Even though you can overwrite many of these shortcuts, information technology's much easier to attach your macro to a push.
Prepare up the Word macro.
Step 2: Add a macro push to the Quick Access Toolbar
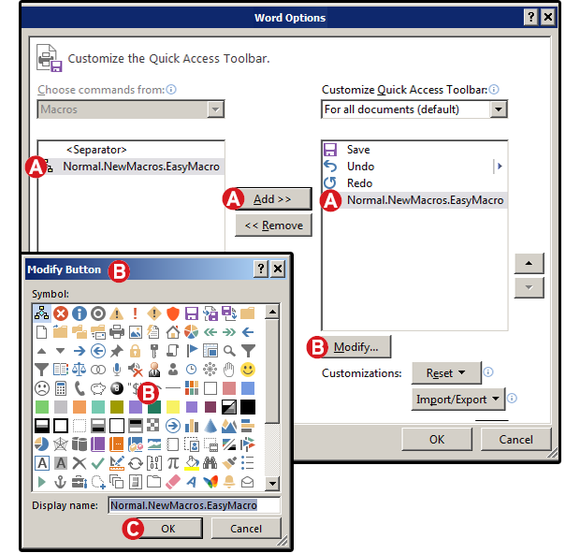
A. ClickButtonand the Word Options/Customize Quick Admission Toolbar screen opens. On that screen, locate your macro, select/highlight information technology, then click Add. Word copies the macro from the left Macros panel to the right Quick Admission Toolbar console.
B. Click Alter, choose an icon to represent your macro push, and then click OK.
C. When finished, click OK once again to leave.
Add a macro button to the Quick Access Toolbar.
Stride 3: Record the macro
Enter the keystrokes you want the macro to record. (See 'A' below.)
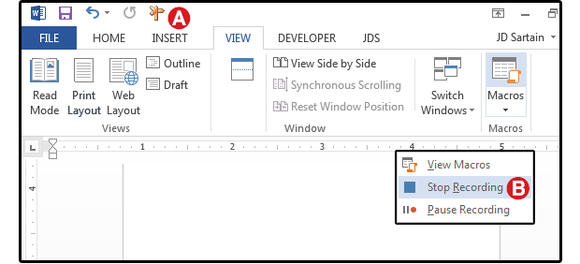
Step 4: Stop recording
When finished, select the View tab again, then click Terminate Recording. (See 'B' beneath.)
Note: Find that your customized macro button appears on the Quick Admission Toolbar. To run the macro again, just click this button.
How to record a macro, and so stop a macro.
3 quick and easy macros
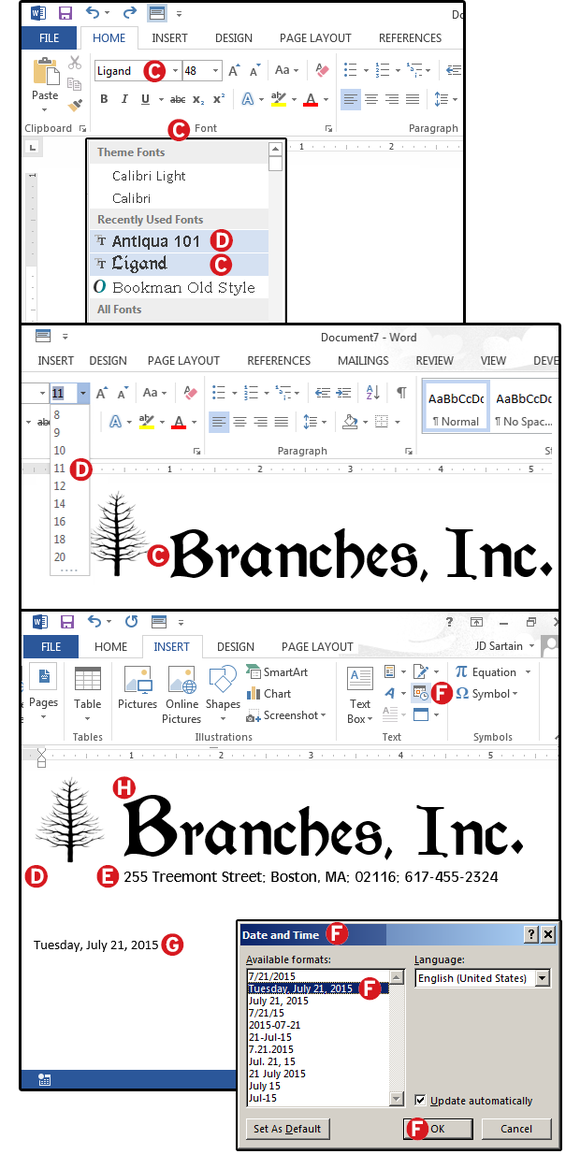
Macro one: Company Letterhead
Most companies accept traded printed letterhead for digital. Take a piffling fourth dimension one time to record this macro, and you lot'll be able to driblet your letterhead onto a document in one easy second.
Repeat steps 1 and 2 above. Proper name the macro (for this case) BranchesLetterhead. Then, for Footstep 3 (macro is now running), follow these macro instructions:
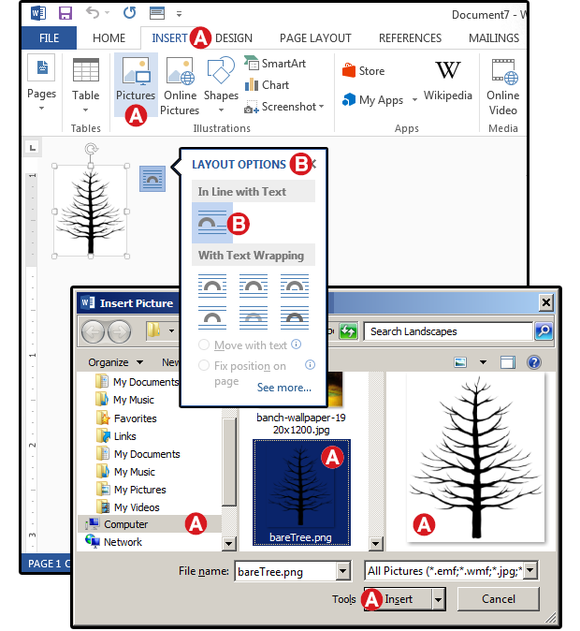
A. From the Insert tab, select Pictures. Navigate to the folder that contains your company's logo, select that image, and click Insert.
B. In the Layout Options dialog, select one of the text wrapping options, and so close the dialog. Press the Esc key to deselect the graphic, then press the Finish cardinal in one case, and the Tab fundamental one time.
Record a macro that creates company letterhead.
C. Enter the company name: Branches, Inc. Highlight the name. Click the drop-down list in the Font group; choose a typeface and font size. Printing the End fundamental in one case, then press the Enter key three times. Next, press the Up arrow twice, and then press Shift + Down, Down (press and hold the Shift central while simultaneously pressing the down-arrow key twice).
D. Select a typeface (for this case, I'm choosing something sans-serif such equally Arial or Helvetica), select a size (xi-point in this example), so printing the Abode central in one case and the Tab key twice.
E. Enter the address information, then press the Enter central iii times.
F. From the main carte, clickInsert > Text, then click the Insert Appointment and Fourth dimension push button. Choose a appointment format from the Date and Time dialog, check the Update Automatically box, then click OK.
One thousand. Highlight and modify the Appointment and Fourth dimension font to your visitor's standard document typeface.
H. Last, highlight the letter 'B' in Branches and increase the font size to 60.
I. From step 4 above, select the View tab again, and click Cease Recording.
At present, someday you need letterhead, just click that BranchesLetterhead macro push on the Quick Access Toolbar.
Tape a macro that creates visitor letterhead, connected.
Macro 2: Insert pre-designed tables
My friend Carrie created a weekly study that included a table with specific measurements, columns, rows, and headers. She used to re-create and paste a tabular array template she created into each new document, but it was always inconsistent and distorted. A table macro was a better solution.
Repeat steps ane and 2 higher up. Name the macro (for this case, CorpRptTable). Then, for Stride 3 (macro is now running), follow these macro instructions:
A. From the Insert tab, click Table.
B. In the Insert Table dialog, slide your cursor horizontally beyond the grid to select the number of columns needed, then slide downward to select the rows. When the filigree is the correct size, click the mouse.
C. Enter the following headers across the top row: Contributor, Occupation, Location, Project, and Donation.
D. With the cursor still positioned at the end of the word Donation in column v, row 1: press and agree the Ctrl and Shift keys, then press the Left pointer key five times.
E. With the first row highlighted, go to the Dwelling house tab and clickParagraph group. Click the icon for middle-justified text, then, in the Fonts group, click Bold. Click the Left pointer cursor key one time to reposition the cursor in cell A1.
Note: When your cursor is anywhere inside the tabular array, the Ribbon displays a new tab-set called Table Tools Pattern and Tabular array Tools Layout.
F. With the cursor however in A1, select Table Tools > Layout. In the Cell Size group, click the Table Column Width button and click the arrows to adjust the column width upwards or downwards. Fix the first column to ane.ii inches. Press the Tab key once, then Left pointer to reposition the cursor in the side by side column.
Note: If the column header is highlighted, the new column width affects that unmarried row merely.
M. With the cursor in the 2nd column before the O in Occupation, get to the Tabular array Tools and click Layout > Jail cell Size group, and ready Table Cavalcade Width > 1.2 inches.
H. Conform the remaining columns to these settings: Location ane.7 inches, Project ane.v inches, and Donations 1.0 inches.
I Press Ctrl+End to reposition your cursor simply outside and beneath the table, then type: Effigy 1.
J. From step iv above, select the View tab once again, and click Finish Recording.
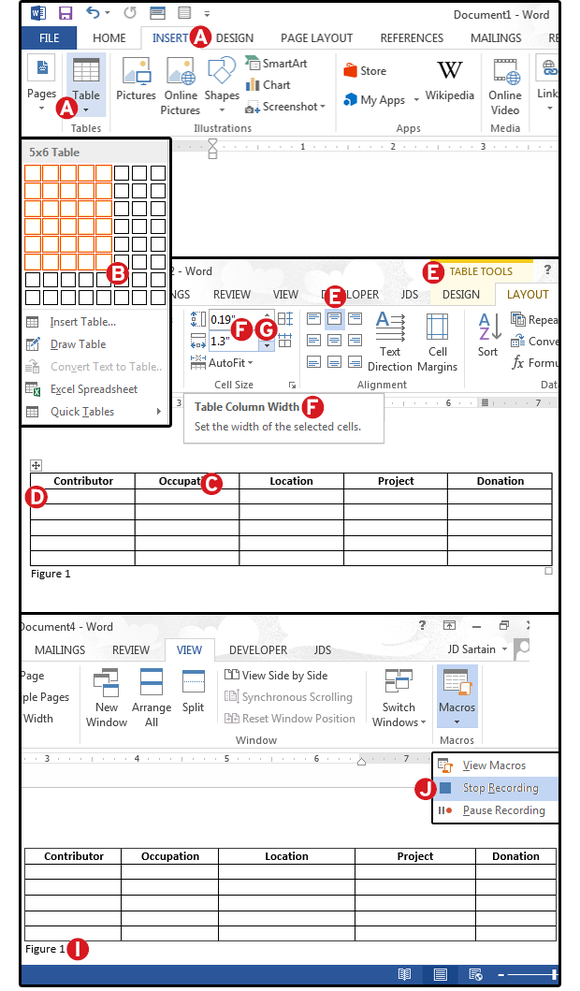
Record a macro that inserts pre-designed tables.
Macro three: Create custom book formats
If you create in-house publications, create a macro that sets up a custom format for each. In fact, you lot could only create ane format, then edit that one and resave information technology to accommodate the individual formats.
Repeat steps 1 and two above. Proper name the macro (for this instance) Book8x5Format. Then, for Step three (macro is now running), follow these macro instructions:
A. From the Page Layout tab, click Page Setup > Size.
B. Select More Newspaper Sizes from the drop-down card.
C. In the Page Setup dialog, select the Newspaper tab, clickPaper Size, then choose Custom from the drop-downward listing.
D. Enter a width size of five.5 inches and a height size of viii.five inches and click OK.
E. Once again, from the Page Layout tab'due south Folio Setup group, click the Margin button.
F. Select Custom Margins from the drop-down list.
Yard. In the Folio Setup dialog, choose the Margins tab.
Note: You lot must conform the Pages settings first, selecting Multiple Pages, because this setting alters the margin fields.
H. From Pages > Multiple Pages, select Normal from the drop-down list. For Sheets per Booklet, select All.
I. Enter margins: Top = 1, Bottom = 1, Left = .v, Right = .5, Gutter = .3, and Gutter Position = Left.
J. For Orientation, choose Portrait, and then click OK.
Note: The image in the Preview pane shows this layout with margins and gutters.
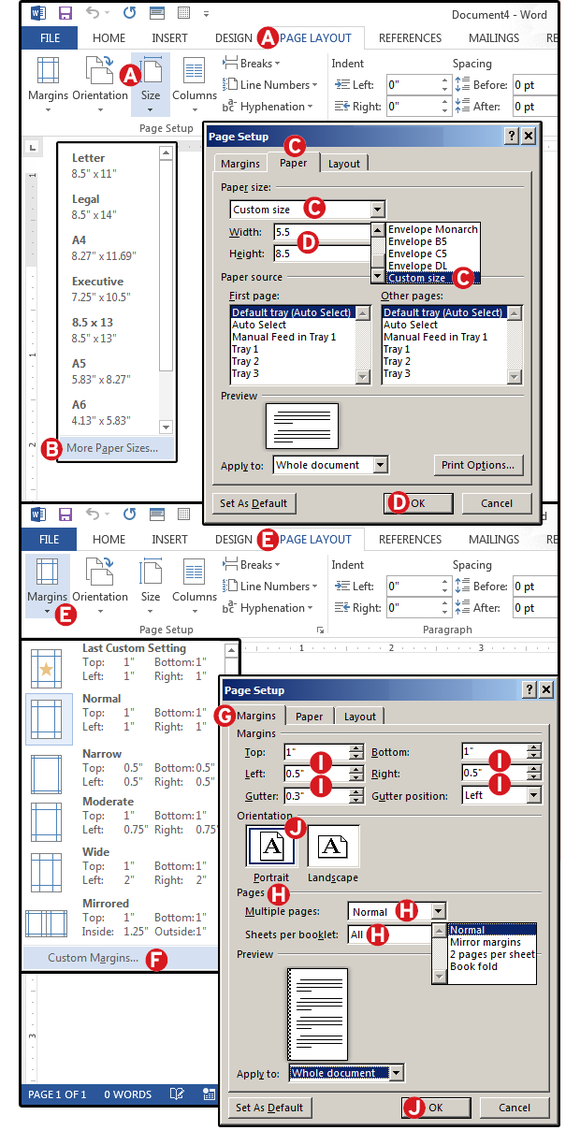
Record a macro that creates custom book formats.
K. Next, select Paragraph under the Folio Layout tab. Click the Indents and Spacing tab.
50. In the General panel, select Alignment = Justified; Outline Level = Body Text.
M. In the Indentation panel, select Left = 0; Correct = 0; Special = First Line; By = .25.
N. In the Spacing panel, select Before = 0; After = 0; Line Spacing = Multiple; At = 1.25. And click OK.
O. Enter a paragraph or so of generic text. Right-click and choose Styles from the popup context carte du jour. In the Styles dialog, select your visitor's stylesheet (CorpStyle) from the list.
NOTE: If your company doesn't have a stylesheet, select Normal. Experience free to read our how-to on creating stylesheets after you lot end this macro.
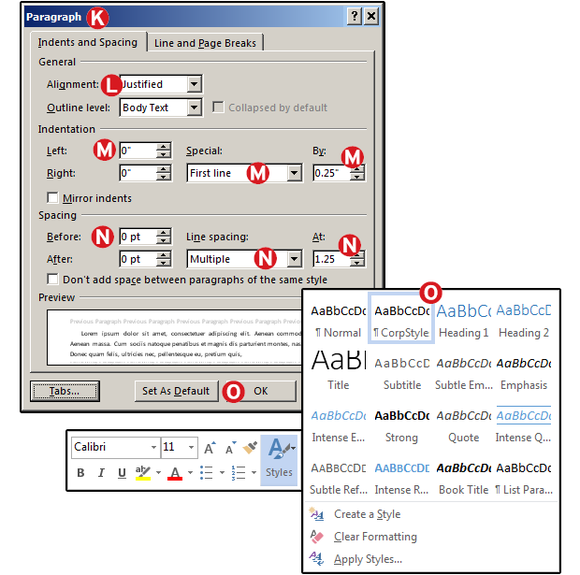
Indents, spacing, and styles for custom book formats.
P. Side by side, select the Insert tab, and become to the Header & Footer group. Click the Header push and choose a way from the list, so enter the header text.
Notation: Detect the Header & Footer Design bill of fare appears.
Q. In the Options group, check the boxes for Unlike Odd & Even Pages. Correct-click for the context menu, select paragraph, and choose Alignment: Right (for the odd folio header). Next, gyre down to the Footer section: Right-click, select Page Number > Bottom of Page > Plain Number 3 (the right-justified placement).
R. Insert a page suspension, then repeat steps P and Q above to add headers and footers to the fifty-fifty numbered pages.
S. From footstep iv above,select the View tab again, and click Stop Recording.
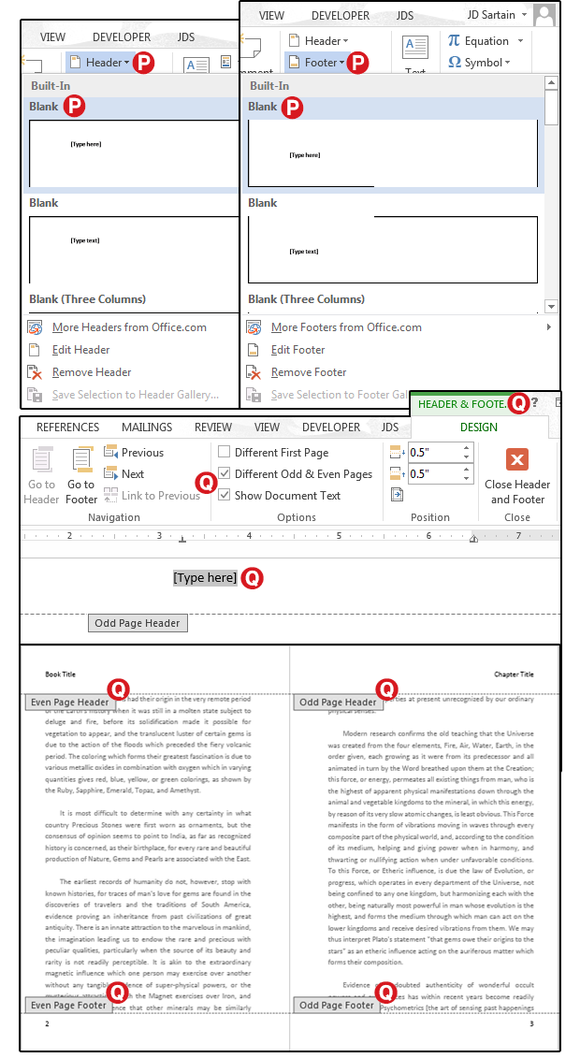
Headers, footers, and pages for custom book formats.
Source: https://www.pcworld.com/article/422689/word-macros-three-examples-to-automate-your-documents.html
0 Response to "Read Footer Formatting and Layout Word Macro"
Post a Comment